If you wonder how to setup Cricut Maker, you need to follow this tutorial! In this guide, I will teach you the complete Cricut machine setup in 4 simplified steps. Although you can use this post to set up any model, I will use the Cricut Maker machine in this blog.
The Cricut setup can be daunting in the beginning, but you don’t have to worry. I have been crafting using Cricut for many years, and I am capable of teaching you how to do it. However, in this blog, I will only discuss the procedure of setting up Cricut Maker.
Let’s start with the basic steps to download Cricut, connect it to a Windows computer, and finally set up the machine. Let’s delve into it.
Step 1: Check System Requirements
Are you using a Windows PC? Well, you can’t use it without knowing the system requirements. This is a must before you learn how to set up Cricut Maker. Since the setup will be done on the Windows system, let’s see what we need to run the software on it.
Please take note of the following system requirements:
- Operating System: Windows 10 or later (64-bit)
- RAM: Minimum 4 GB
- Disk Space: At least 2 GB free
- CPU: Intel Dual Core or equivalent AMD processor
- Display: Minimum screen resolution of 1024px x 768px
- Connection: A USB port or Bluetooth connection is required.
Step 2: Download & Install Cricut Software
In order to learn how to set up Cricut Maker, you have to download Cricut Design Space software on your PC. Since all the setup steps are to be done on the app, you must download it beforehand.
- On your PC, open your browser and enter this URL: cricut.com/setup.
- After that, you will need to choose the product type: Cutting Machine.

- Then, accept Cricut’s Terms of Use and click on the Download button. Now, your Cricut software will start downloading.
- Once downloaded, you have to go to the Downloads folder and open it.
- Just double-click on the downloaded file and begin the installation.
- Finally, you will have your Cricut software downloaded to your PC.
Step 3: How to Set up Cricut Maker
Finally, I will walk you through the steps to set up a Cricut machine stepwise. Make sure you have downloaded the Cricut software on your PC and checked its compatibility.
- Launch the Design Space app on a Windows PC and click on Product Setup.
- Now, you should create your Cricut account.
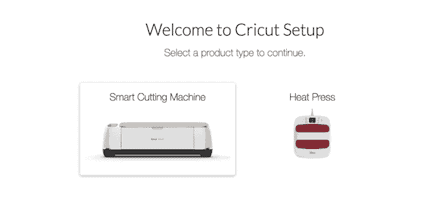
- Once done, you have to select a Smart Cutting Machine.
- Next, click on the Cricut Maker machine.
- After that, you need to follow the screen’s prompts for further setup.
Once you complete the above steps, you will need to connect your Cricut to your PC. I have explained this separately in the next step for your convenience. Please follow the steps carefully.
Step 4: Connect Cricut to PC Using Bluetooth
To complete the Cricut setup, you must connect it to your PC. Then, you will be able to use your machine.
Here’s how to connect Cricut cutting machine to a PC wirelessly:
- Take your power cable out and plug it into your PC and machine.
- After that, press the power button located on the top of the machine.
- Once you have powered on your machine, go to your PC.
- On your Windows desktop, press the Windows logo icon + I keys to enter Settings.
- On the following screen, choose Devices.
- Now, enable Bluetooth and select Add Bluetooth or other device.
- Next, you will see a pop-up asking you to add a device. Choose the Bluetooth option.
- Wait for a while and pair your machine with your PC.
- Once it is found, select it and pair the machine with the PC.
Kudos to you😍! You have learned how to set up Cricut Maker on your Windows computer. From checking system requirements to connecting Cricut to a PC, it might not be as daunting as it seemed to be. Good luck with your first project; now you are all set to create your first project on Cricut.
FAQs
Question 1: Is it necessary to set up Cricut on PC?
Answer: No, it depends on whether you have any compatible device or not. According to Cricut, there are four compatible devices on which you can use Cricut software, and hence, you can use your Cricut hassle-free. These are Windows, MacBook, Android, and iOS devices. So, make sure you have one of the devices available.
Question 2: How is setting up Cricut Maker possible on Android?
Answer: To set up your Cricut on your Android phone, follow the steps below:
- Plug the power cable into your Cricut and wall outlet.
- Pair your machine with your Android phone using Bluetooth.
- After that, you have to download the Cricut software.
- Now, launch the app on your phone and create or sign in using Cricut ID.
- Next, click on the menu and choose Machine Setup.
- Then, choose the Cricut model.
- Lastly, follow the rest of the steps displayed on the screen.
Question 3: How to connect Cricut Maker to a PC using a USB cord?
Answer: Follow the steps mentioned below and connect your machine to your Windows PC using the USB cable:
- Make sure you have turned on your Cricut and PC.
- After that, use one end of the cord and insert it into the back of the machine.
- Then, take another end and insert it right into the PC.
- Finally, your Cricut is connected to your PC with a USB cord.